Operations
Manual

This WordPress plugin enables you to create “cash” pages where you list your own or affiliate offers right on your site. You can customize the page design and layout of the products to match your site with the extensive options.
Note: This plugin also comes in a lite version which doesn’t have the following options included: Restricted user, Top Style, Footer Style, Box Style, Menu Style, Menu Color, Social Icon Style, Open Graph Image URL, Favicon URL, Tracking Code and Script.
Please review the rights provided when you purchased.
Need a good WordPress theme? CLICK
HERE
Contents
Getting Started
We are assuming that you already know how to login, install and activate a WordPress plugin. If you do not please review the official WordPress site for extensive documentation.
Let’s get started.
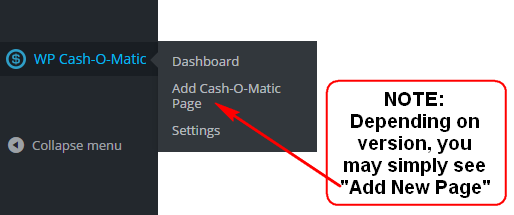
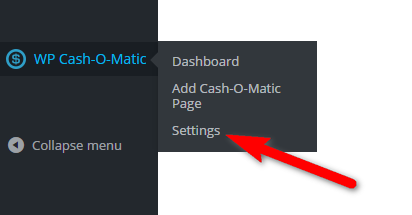
Once logged in and with plugin activated you will see a new section like:
Permalinks
We highly recommend you change this setting BEFORE creating any new pages or offers. It is best if you make your decision now and stick with it.
Keep in mind that once you setup your Cash-O-Matic permalinks and search engines index your pages, changing permalinks at later dates is bad business… Basically you will end up with search engines and even worse, visitors experiencing 404 errors.
To setup your permalinks:
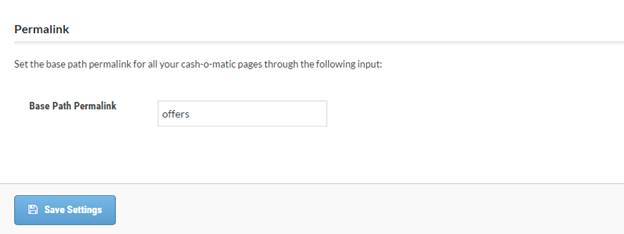
In above example, you would have a URL like:
http://<yourdomain>/offers/<pagename>
The Pages Section
To take advantage of this template’s design, use the Styles gallery on the Home tab.
To add a new page, hover your cursor to the plugin’s menu item from the left admin panel then click Add New Page.
Once you clicked the “add new page” this screen will appear:
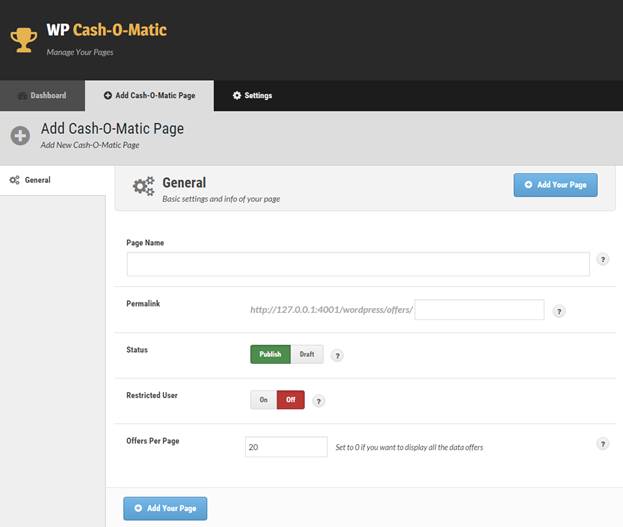
Ø Page Name. Supply a unique name for your new page to easily distinguish it from the rest of your pages and make it easier to find at later dates.
Ø Permalink. This field determines the structure of your page’s link. If you skip filling out this field the system will automatically generate a permalink based on the page name you provided.
Ø Status. Choose whether you would like the page to be live by switching the switch to Publish or temporarily save it as Draft while you are still editing it.
Ø Restricted User. This switch determines if the page will exclusively be available to logged in users of your site by selecting On. By default, this switch is set to Off so it is accessible to all visitors of your site. Note that this option is not available in the lite version of the plugin.
Ø Offers Per Page. Input a numerical value (2, 10, 20, etc.) for number of offers you wish to be displayed on your page.
After you have reviewed and are happy with your page settings, click “Add Your Page” to save and you can further customize it.
Once your page has been added, you will be redirected to the page’s edit section where you can customize and manage it.

Before you start your new page customization, keep in mind many of the options are optional. Meaning that you do not have to touch every setting for your page to function.
At very first look you may think it is over whelming but in fact it is very simple. With very little input you can have very nice looking pages. Most of the settings are for those that “must” match their current site look and feel.
Recommend you tweak your page design with minimal features and then come back to spend time deeply customizing it.
Let’s start with the Header and Footer…
Remember: You can always come back and customize your pages after adding your offers.
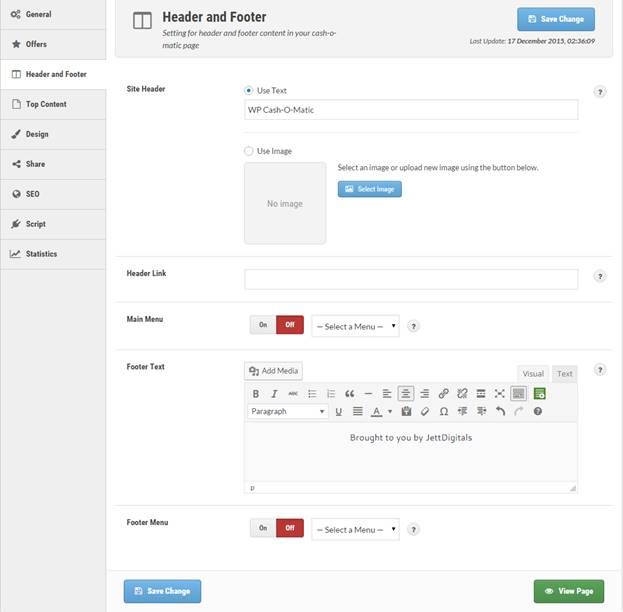
Ø Site Header. Select whether you would like to have a text or image based header. To have a text-based header, select the radio button labeled “Use Text” and enter the content that will appear on the header. For image-based header, select the radio button with the label “Use Image” and upload the image from your computer. You also use images already uploaded in your media library for the custom header.
Ø Header Link. Enter complete URL you wish the user to be redirected to should they click on the header. However, if you prefer not to have a clickable link in your header, leave this field empty.
Ø Main Menu. Choose whether to display a navigation menu on the header section by clicking “On”. Then select an active menu to use from the dropdown next to the switch. Leave this field “Off” if you prefer not to display any menu.
Ø Footer Text. Use the WYSIWYG editor to add contents to the footer section of your page.
Ø Footer Menu. Select “On” if you would like to enable an active menu from the dropdown menu. Leave the switch to its default setting “Off” if you do not want menu active.
Ø
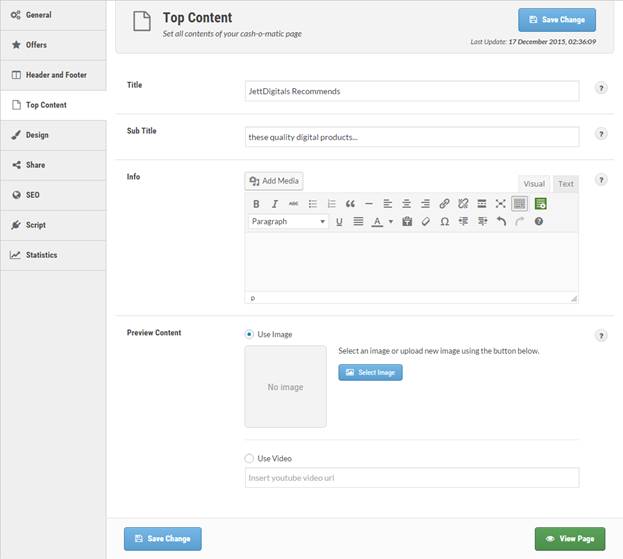
Title.
This is the heading or title of your
page’s top content and appears in header.
Ø
Sub-title.
Subheading or tagline of your profit page’s top content.
Ø
Info.
Use the WYSIWYG editor to add details and information of your profit page.
Ø Preview Content. This section allows you to choose what medium to use as a preview to your content. Select “Use Image” to display your preview content through image. Select “Use Video” to present your preview content through a YouTube video.
v
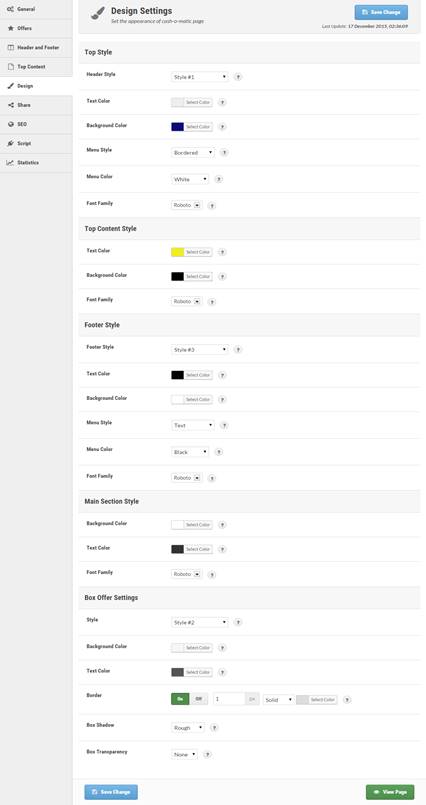
Top Style. This
section contains options to customize the style of the page header. Note that this section is not available in
the lite version of the plugin.
Ø
Header
Style. Choose from the 3 predefined header styles from the dropdown which
one you would like to use and apply on the header of the profit page.
Ø
Text
Color. Using the built-in color picker, select the color you would like the
text contents in the header to be displayed in.
Ø
Background
Color. Use the built-in color picker to set the background color to apply
to the header section of the profit page.
Ø
Menu
Style. Choose from the predefined menu styles the one you would like to
implement on the header section’s menu if applicable.
Ø
Menu
Color. From the dropdown, select the color that would define the color of
the menu items on the menu.
Ø Font Family. This field determines the font family to be used on the text contents of the header section.
v
Top Content Style.
This section contains styling options for the top content portion of the page.
Ø
Text
Color. Use the built-in color picker to define the color to which the text
contents will be displayed in.
Ø
Background
Color. This field allows you to set the background color of the top content
section using the built-in color picker.
Ø
Font
Family. Select from the list of fonts you would like to use and apply to
the text contents of the top content section of the profit page.
v
Footer Style.
This section allows you to customize the style of the footer area of the profit
page.
Ø Footer Style. Choose from the 3 predefined footer styles you would like to apply to your profit page’s footer. Note that this option is not available in the lite version of the plugin.
Ø
Text
Color. Using the color picker, select the color you would like to display
all the texts in the footer area.
Ø
Background
Color. Define the color you would like to implement as the background color
to the footer section using the system’s built-in color picker.
Ø
Menu
Style. If you have enabled menu display on the profit page, select from the
predefined styles available on the dropdown you would like to apply to the
footer menu. Note that this option is not available in the lite version of the
plugin.
Ø
Menu
Color. Select from the dropdown the color of the texts you would like it to
be displayed on the menu. Note that this option is not available in the lite
version of the plugin.
Ø
Font Family.
From the dropdown, select the font you would like to use and apply to the text
contents of the profit page’s footer.
v
Main Section Style.
This section enables you to customize the style of the profit page’s main
section.
Ø
Background
Color. Use the built-in color picker to choose a color to apply as the
background color of the profit page’s main section.
Ø
Text
Color. Choose the default color to be applied on the profit page’s text
contents using the built-in color picker.
Ø
Font
Family. Select from the dropdown the default font to use on the profit
page.
v
Box Offer Settings.
This section contains styling options to customize the look of the boxes where
all the offers and the corresponding contents are enclosed. Note that this
section is not available in the lite version of the plugin.
Ø
Style.
Select from the 6 predefined styles in the dropdown you would like to use on
the boxes containing your offers.
Ø
Background
Color. Use the built-in color picker to select the background color to be
applied to every box.
Ø
Text
Color. Use the built-in color picker to select the color of the text
contents to be displayed in the box.
Ø
Border.
Allows you to further improve the look of the boxes by applying a border around
it. Turn the switch on to use the border option then set how wide in pixels
will the border be, the style (whether solid, dashed or dotter) and the color
of the border using the built-in color picker.
Ø
Box
Shadow. Select from the dropdown which style of box shadow you want to
apply to the boxes or apply no box shadow at all.
Ø Box Transparency. From the dropdown, choose how transparent you would like your boxes to be displayed.
Ø
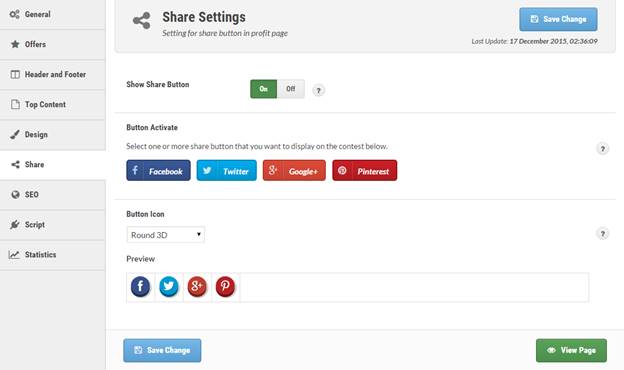
Show
Share Button. This switch controls whether you would like to enable the
display of the social sharing buttons to your box offers by turning it On or
turn it Off to hide it.
Ø
Button
Activate. Choose from the 4 most popular social sharing site you would like
to be available on every box offer. Click the icon of the social sharing site
to activate or deactivate its usage. By default all 4 are activated as
indicated by the full colors of every icon. Deactivated social sharing site
will have the icon displayed in grayscale.
Ø
Button
Icon. From the dropdown, select the style of the social sharing buttons you
would like to use as it gets displayed on every box offer. Note that this
option is not available in the lite version of the plugin.
Ø Preview. Displays a preview or a sample of how the selected style of the button icon looks like.
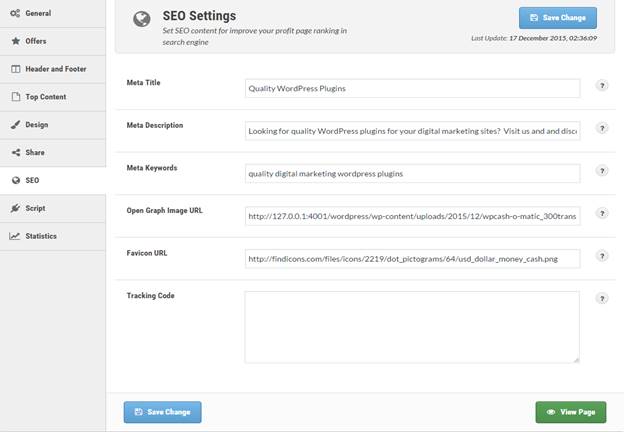
Ø
Meta
Title. Supply this field with the profit page’s meta title.
Ø
Meta
Description. Enter in this field information that would tell search engines
what your page is about.
Ø
Meta
Keywords. Enter in this field relevant keywords for your profit page.
Ø
Open
Graph Image URL. Supply this field with the complete URL of the image you
would like to appear on social sharing sites when users share your offers. Note that this option is not available in
the lite version of the plugin.
Ø
Favicon
URL. Provide the complete URL of the favicon you would like to use for the
profit page. Note that this option is not
available in the lite version of the plugin.
Ø
Tracking
Code. Enter in this field the tracking code to track the performance of
your profit page. Note that this option
is not available in the lite version of the plugin.
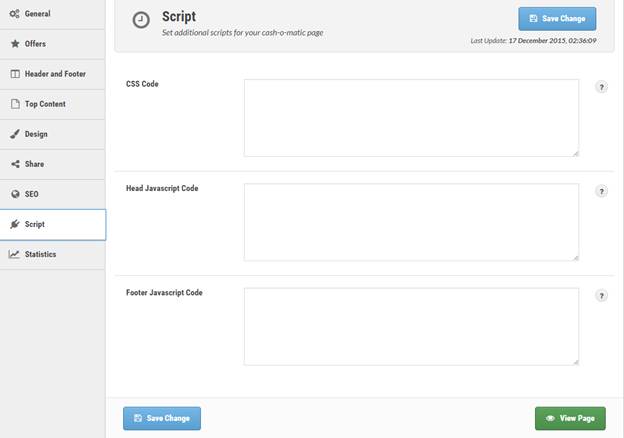
Ø
CSS Code.
Enter in this field custom CSS code you want to apply on the profit page.
Ø
Header
Javascript Code. Enter in this field the custom Javascript codes that
should be placed in the header section of the profit page just before the
closing head tag.
Ø Footer Javascript Code. Enter in this field the custom Javascript codes that should be placed in the footer section of the profit page just before the closing body tag.
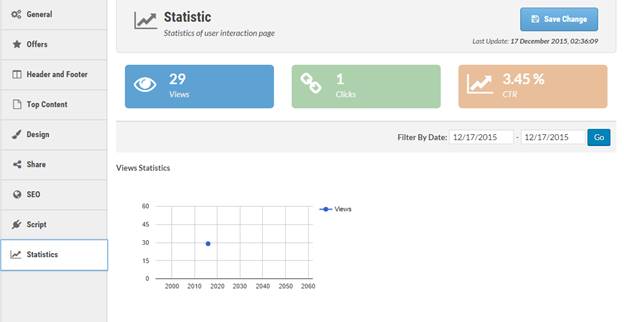
Ø
Views.
The views section displays the number of views the profit page has received.
There is also a graphical representation of the data. Additionally, you can
filter the data being displayed by date.
Ø
Clicks.
The clicks section displays the number of clicks made by the visitors on the
offers. A graph is also available wherein the data for the number of clicks is
displayed. Moreover, the data can be filtered by date.
Ø CTR. The click through rate section displays data that compares the number of visits the profit page gets with visits wherein users click on the offers.
IMPORTANT: Once your settings have been
reviewed and finalized, click the Save Change button to update your page with
the changes. You can then view the site live by clicking the View Page button.
The Offer Section
Adding a new offer is straight forward but let’s cover the basics.
As you will notice below there is an “Offers” tab and when clicked on:
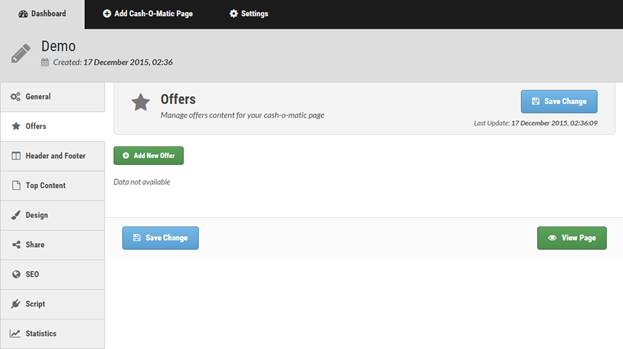
Click the green button “Add New Offer”.
A popup window will appear containing fields and options to add your new offer for the cash-o-matic page you created earlier.
Let’s go step by step…
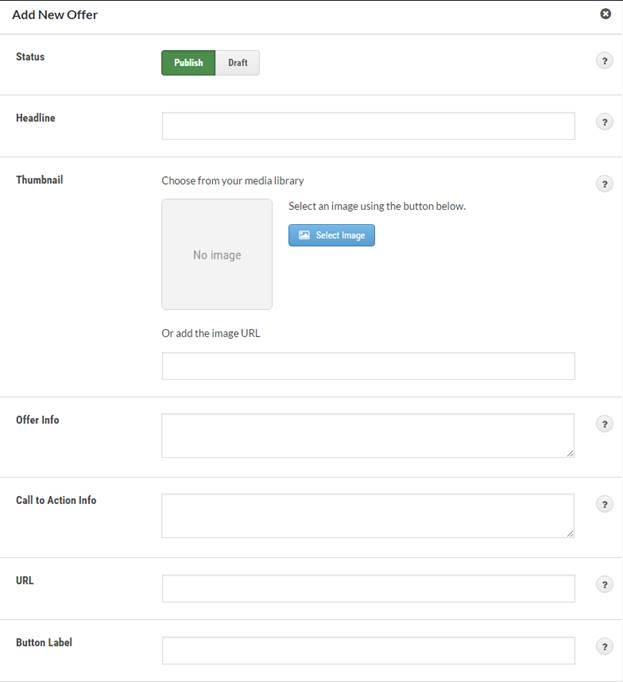
Ø Status. Use this switch Publish or select Draft if it still require edits.
Ø Headline. Enter your heading or title of the offer. Normally would be the name of product which you are promoting.
Ø Thumbnail. Upload an image from your computer or use an already uploaded graphic from your media library to use for your offer. Or, if you have already uploaded it online (like affiliate product), supply the image URL below the select image button.
Ø Offer Info. This field should be filled out with the details regarding the offer.
Ø Call to Action Info. Enter information that would encourage the visitors to click your offer.
Ø URL. Enter in this field the complete URL of the page containing more details and information of the offer.
Ø Button Label. The text label of the button where the link to the offer is embedded.
Ø Button Style. From the dropdown, select the style of the button you would like to use and apply to the offer.
Ø Open in New Tab Window. Turn the switch on to open the link of the offer to a new tab or window.
IMPORTANT: Click “Add New Offer” button to save and add to your
page.
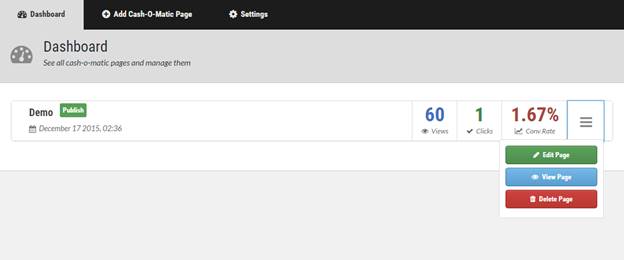
Managing
Once you have pages setup, managing them is simple.
Go to the “Dashboard” link and click the far right icon with three (3) lines. You will then see three (3) options; Edit, View and Delete.
To manage offers on a specific page, edit the page and click the “Offers” tab. All offers that you created will be displayed in a list view.
![]() To order / re-order your offers,
simply grab the four (4) headed arrow icon then drag offer to the
location/order you desire.
To order / re-order your offers,
simply grab the four (4) headed arrow icon then drag offer to the
location/order you desire.
To edit an offer, simply click the green edit button.
WordPress Resources
We have bought many plugins and themes over the years.
80% of both are now defunct and never updated. Sad but true. Many people are out there for a quick buck and we all know where they hang out J No use in saying bad things about that forum…
If you need quality, and I mean TOP quality WordPress themes, you will find them here:
Many of the plugins I own come from:
Bottom line is to shop at a place where people are NOT given
free copies in exchange for a review. Shop
at a place where you can verify people giving great reviews actually bought the
product!